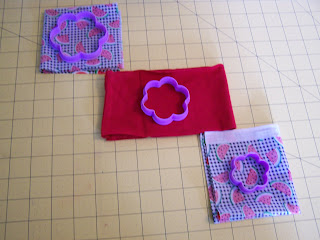
This is how to make the hair tie to match your Super Easy Dress. :)
Supplies:
Fabric scraps from the dress (t-shirt & cotton print)
1 rubber elastic band
Scrap of craft felt (about the size of a half dollar)
3 cookie cutters (I bought mine at Jo-Anns; they came in a package of 6 for $1.99; if you don't have the cookie cutters, you only need 3 of the same shapes that are small, medium and large)
Not pictured:
Hot glue gun (I used a low-temp one for this project)
Pins
Scissors

Step 1: Fold one of your fabric scraps (this will be used for your largest size shape) into fourths.
See photos below for any clarification.
Step 2: Repeat Step 1 for other fabric scraps. You should have 3 squares that are large enough for your large, medium and small shape.
Step 3: Trace your shape onto your fabric with a pen.

Step 4: Cut out each of your shapes. Note: it is easier to cut all 4 shapes when the layers are pinned together. You won't have to cut each shape out 4 times. :)
Step 5: Fold each of your shapes into fourths. See photo below for clarification.
Step 6: Place a drop of glue near the center of each of the fourths to hold its shape.
Step 7: Arrange your shapes, to where it looks like the original "whole" shape. Note: I left mine spaced apart so you could see what I mean.
Step 7: Cut your scrap of craft felt into a circle. Approximately the size of a half dollar.
Step 8: Place a drop of glue into the center of the circle, and arrange your large shapes with no spaces between them. See photos below for clarification.


Step 9: Place a drop of glue into the center of the circle, and arrange your medium shapes with no spaces between them, rotate the shapes 90 degrees; so you won't have a space between each seam and layer, and have it look like it is four separate pieces. See photo below for clarification.
Step 10: Place a drop of glue into the center of the circle, and arrange your smallest shapes with no spaces between them; rotate the shapes 90 degrees so their seams line up with the larger shapes below. See photos below for clarification. (Sorry the photo is so dark, but you can see what I'm trying to say best in this photo as far as the rotation goes.)
Step 11: Use another scrap of your middle layer fabric and make a knot. Trim the ends off.

Step 12: Place a large dot of hot glue into the center of your shape, place knot from Step 11 on it and press in place.

Step 13: Turn over shape, place a large drop of glue in center and place rubber elastic band in glue. Rotate to have glue cover rubber elastic band completely. Note: let glue completely cool and dry before putting in hair. I don't think that anyone would put this in their hair while still setting, the low-temp glue gun takes about 10 minutes to completely cool.


No comments:
Post a Comment