This project took a lot more time to complete than I had originally expected. Please read through all of the directions before doing this project. If you have any questions about this, please e-mail me or comment on this blog and I will answer you as fast as possible. :)
From beginning to end it took just under 2 hours to complete, but I finished it and even my husband thinks it is "cute." (that was his exact word too!)
Supplies:
1 skein of yarn (choose any color I chose a beige color because my daughter is blond)
1 3" x 5" oval plaque
Paint- I used Americana brand:
Peony Pink
Lamp (Ebony) Black
Snow (Titanium) White
Flesh Tone
True Blue
Honey Brown
Scrap of ribbon (I forgot to take the picture of it)
Supplies:
1 skein of yarn (choose any color I chose a beige color because my daughter is blond)
1 3" x 5" oval plaque
Paint- I used Americana brand:
Peony Pink
Lamp (Ebony) Black
Snow (Titanium) White
Flesh Tone
True Blue
Honey Brown
Scrap of ribbon (I forgot to take the picture of it)
Hot Glue gun


Step 1: Paint the oval plaque Flesh Tone.

Step 2: Measure out 28" of yarn, and make a loop. Repeat this until you have 75 loops.

Step 3: Tie a strand of yarn on one of the ends of your loop. This will become the "middle part" for the hair later.

Step 4: Sketch the face of your girl. Make sure you take in account any "bangs" you may give this little face. :)

Step 5: Paint the face to your own liking. (I made mine have blue eyes like my daughter.)

Step 6: Put a large drop of glue on your plaque. Quickly adhere the yarn loop where you made your "part," refer to photos below for clarification.


Step 7: Cut the other side of the loop. You will have 2 sides of "hair" now.


Step 9: Place a line of glue across the forehead, and press all of the yarn in place. Trim to desired length.

Step 10: Braid one side of the hair. Secure end of braid with a strand of yarn by double knotting it in place. Trim excess.
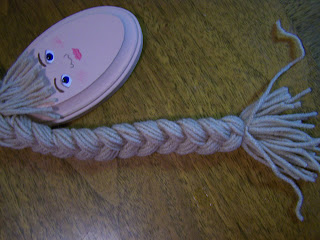

Step 11: Repeat Step 10 for the other side.


That's it! ;)

Step 8: Remove 10 strands of yarn from each side. These will become the "bangs."

Step 9: Place a line of glue across the forehead, and press all of the yarn in place. Trim to desired length.

Step 10: Braid one side of the hair. Secure end of braid with a strand of yarn by double knotting it in place. Trim excess.


Step 11: Repeat Step 10 for the other side.
Step 12: Paint a shirt onto the plaque as shown below.

Step 13: Tie ribbon to the end of each braid and trim excess. Secure the bow with glue. (This will make sure it doesn't get untied and keeps in place.)

That's it! ;)

No comments:
Post a Comment