Lately I have been pretty obsessed with sugar scrubs. Seriously. I think that I have a new addiction to the sweet goodness that leaves my skin feeling as soft- if not softer than my 5 year old. How cool is that? :)
Anyhoo... if you don't know what a sugar scrub is, then let me fill ya in real quick. A sugar scrub is a natural exfoliator that you can use on your hands, feet, body - wouldn't recommend your face though, might be too rough/coarse for sensitive areas- to get that extra dry skin off so you can moisturize it into being smooth and silky. The bonus is that these scrubs are very inexpensive and can be whipped up with stuff you have in your kitchen cabinets right now. The basics are sugar and oil. That's it. Easy peasy. Now of course, smelling like oil isn't probably high on your "oh my goodness, I have to make that sugar scrub now!" list but hey- I said it was the basics. ;) That's why you have to add the other ingredients to make it smell super yummy!
If you head over to Brown Eyed Baker's site you can find a delicious recipe for a Brown Sugar and Spice scrub. If you would like something a little more citrus in flavor head on over to Under the Table and Dreaming for her lovely Lemon Scrub- a personal fave of mine.
In case those don't hit the spot for ya, you can go to C & H's website and get three different recipes for sugar scrubs a vanilla, spiced, and another brown sugar one too.
Now... if you haven't found a particular recipe mentioned above to inspire you to go raid your cabinets for some delightful gifts you can seriously whip up in less than 5 minutes, you can always order Erin's e-book A Year of Sugar Scrubs 24 Original Recipes for only $3.99!! I just won a copy of this from Tatertots & Jello, and let me tell ya- it is awesome!! I love how she has different flavors for different times of the year. The Caramel Frappe one, the Pina Colada one... I'm just trying to decide who to give them to! :)
So... if you are running out of time for Christmas gifts or stocking stuffers for the ladies in your life, whip up one of these little jars of pampering goodness. I promise- you won't be sorry. :)
Showing posts with label Christmas. Show all posts
Showing posts with label Christmas. Show all posts
Monday, December 19, 2011

Thursday, December 1, 2011
Super Cool Earrings!

These are seriously super incredibly easy to make!
Here's the link from a lady I found through a Pinterest browsing adventure. :) Have I mentioned how much I love that site?? ;)
Here's my spin on them. I decided to make a pair of festive trees. :) Evie's blog has a great tutorial for a more mod looking earring. So hop on over there and make yourself a pair too! :) I whipped these up in about an hour. I used 2 paperclips, some embroidery yarn, beads and a pair of earring wires- all stuff I had on hand. :)
Have a wonderful Christmas! :)
Friday, September 17, 2010
6 cups of coffee so far... to kick start a great weekend!
Waking up at 5am this morning, the need for having a hot cup of coffee in 90+ degree weather seemed like a good idea. ;) So, as I pulled the coffee filter out of the packaging, it hit me. I also had the need to make a coffee filter wreath.

(Ahhh... the season of crafting is about to get fun and exciting over here. Not that it isn't usually, but with Halloween, Thanksgiving and Christmas in quick succession, the need for seasonal craftiness is prime.) ;)
Now, what shape of wreath should I make? Square? Round? I'm thinking of either orange or deep purple with a raven, skulls, etc. Depends on what happens to jump into my cart at Dollar Tree later. ;) I'll post pics once it is done. ;)
Hope you all have a fantastic weekend!

Saturday, December 12, 2009
Christmas Tree Bell
I love bells and wind chimes, any time that I can either make one or get a new one, I will do it. ;) Today, my daughter and I made this in less than 15 minutes. Using a hot glue gun makes this project go together really quickly- just be careful with little ones, so they don't burn their fingers with the buttons and hot glue. You can use a thicker craft glue also for younger crafters. :)
Supplies:
1 2-1/2" terra cotta pot (the taller one)
1 3/4" wooden bead
12" silver twine
15 buttons of varying size and color
Green acrylic paint
Tools: (not pictured)
1 paint brush
paint plate
hot glue gun

Step 1: Paint terra cotta pot green. Let dry completely.

Step 2: While paint is drying, fold silver twine in half. Knot end near loose ends, so you will have a loop.

Step 3: Thread wooden bead on to silver twine.

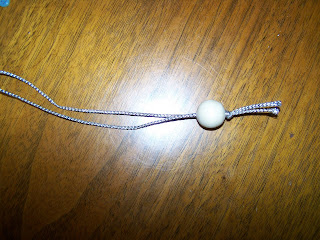
Step 4: Make another larger knot on silver twine. Set aside.
Note: The length can vary; she made hers about 1-1/2" above the wooden bead.


Step 6: Thread silver twine/wooden bead piece from Step 4 through the bottom of tree to the top where the drainage hole is at. Pull through completely. (It will stop from the second knot you made.) Refer to pictures for clarification.


Supplies:
1 2-1/2" terra cotta pot (the taller one)
1 3/4" wooden bead
12" silver twine
15 buttons of varying size and color
Green acrylic paint
Tools: (not pictured)
1 paint brush
paint plate
hot glue gun

Step 1: Paint terra cotta pot green. Let dry completely.

Step 2: While paint is drying, fold silver twine in half. Knot end near loose ends, so you will have a loop.

Step 3: Thread wooden bead on to silver twine.


Step 4: Make another larger knot on silver twine. Set aside.
Note: The length can vary; she made hers about 1-1/2" above the wooden bead.

Step 5: Glue buttons on to your "tree" in any fashion you like. (She did the buttons: large first, then medium and finally small.)
Note: If using a hot glue gun for this step, be careful because the glue will come through the buttonholes.


Step 6: Thread silver twine/wooden bead piece from Step 4 through the bottom of tree to the top where the drainage hole is at. Pull through completely. (It will stop from the second knot you made.) Refer to pictures for clarification.


That's it!
Sunday, December 6, 2009
Reindeer Brooch
This is an idea that my mother-in-law told me about as a great craft project for this blog. This idea is not mine- although it is really cute and I had to make it once I heard about it. ;)
This project really depends on how fast your paint and glue dry. If you get impatient you can dry your paint with a hairdryer and have this entire project completed in about 15 minutes or less! Your child can paint the puzzle pieces while you get the antler's formed and make some bows for some crafty teamwork!! :)
Note: If your child is doing the painting and you choose to use craft glue instead of hot glue, this project will take a bit longer due to the craft glue's drying time.
Supplies:
Brown Acrylic Paint (can be beige if you choose brown for the antlers)
2 puzzle pieces (one needs to be an edge- not a corner, the other a middle piece)
Scrap of 1/8" green or red ribbon (less than 6")
Red pom pom (1/4")
2 wiggley eyes 7mm size
1" straight pin with closing mechanism (I didn't picture it in the supplies below, but it is shown in the last step)
1 Chenille stem (can be beige or brown- I used beige because I painted the reindeer brown)
Hot Glue gun (can use a thicker craft glue)

Step 1: Trim your edge piece of puzzle to have only the two tabs left. These will be your reindeer's ears.

Step 2: Paint back of puzzle pieces brown and let dry.

Step 3: Tie ribbon into a bow. Trim excess.


This project really depends on how fast your paint and glue dry. If you get impatient you can dry your paint with a hairdryer and have this entire project completed in about 15 minutes or less! Your child can paint the puzzle pieces while you get the antler's formed and make some bows for some crafty teamwork!! :)
Note: If your child is doing the painting and you choose to use craft glue instead of hot glue, this project will take a bit longer due to the craft glue's drying time.
Supplies:
Brown Acrylic Paint (can be beige if you choose brown for the antlers)
2 puzzle pieces (one needs to be an edge- not a corner, the other a middle piece)
Scrap of 1/8" green or red ribbon (less than 6")
Red pom pom (1/4")
2 wiggley eyes 7mm size
1" straight pin with closing mechanism (I didn't picture it in the supplies below, but it is shown in the last step)
1 Chenille stem (can be beige or brown- I used beige because I painted the reindeer brown)
Hot Glue gun (can use a thicker craft glue)

Step 1: Trim your edge piece of puzzle to have only the two tabs left. These will be your reindeer's ears.

Step 2: Paint back of puzzle pieces brown and let dry.

Step 3: Tie ribbon into a bow. Trim excess.


Step 4: Cut chenille stem in half.

Step 5: Fold the stems in half.

Step 6: Fold the chenille stems to make your antler's forks. 


Step 10: Glue your wiggley eyes to the face of your reindeer as shown below.

Step 11: Glue your red pom pom to your reindeer's face as shown below. 
Step 12: Flip your reindeer over, and place a drop of hot glue to place your antlers on, as shown below.

Step 13: Flip your reindeer over to look at the face, and glue bow from Step 3 as shown below. 
Step 14: Flip reindeer over and glue pin in place. 
That's it! :)

Step 5: Fold the stems in half.
Note: Do this to both of them at the simultaneously so your antlers will look the same.

Step 6: Fold the chenille stems to make your antler's forks.
Note: Do this to both of them at the simultaneously so your antlers will look the same.


Step 7: Pinch your antler's forks together.
Note: Do this separately now, you don't want to bind them to each other. :)


Step 8: Twist (like you do a twist tie for a bread bag) the end of the chenille stem together to finish your antlers.


Step 9: Glue your 2 puzzle pieces together as shown below.


Step 10: Glue your wiggley eyes to the face of your reindeer as shown below.

Step 11: Glue your red pom pom to your reindeer's face as shown below.

Step 12: Flip your reindeer over, and place a drop of hot glue to place your antlers on, as shown below.

Step 13: Flip your reindeer over to look at the face, and glue bow from Step 3 as shown below.

Step 14: Flip reindeer over and glue pin in place.

That's it! :)
Tuesday, December 1, 2009
A New Twist on an Old Tradition
December is here finally- or maybe a bit too quickly... either way Christmas is only 25 more days away! I remember making paper chains when I was younger to count down the days until Christmas, having them hang from the front door for my very first homemade advent calendar.
Today's blog was going to be that very thing; a paper chain- only I was going to make it out of scrapbook paper instead of the traditional red and green construction paper. Then on my way to Michael's to pick up the scrapbook paper, I changed my mind; that would be such a waste of beautiful scrapbook paper; there has to be a better way. So, I came up with this idea instead. :)
I went to Jo-Ann's instead, and went straight to their remnant bins. That is where I found my first piece of fabric, and quickly I matched up 3 other fabrics and made my purchase. The lady cutting my fabric wanted to know what I was doing, and I told her my idea (hoping at this point it would work- or you would be making paper chains tonight) and she loved it. So... without waiting any longer here is tonight's new craft idea! :)
Project Note: I did the prepwork, just like you would prep the paper strips for your little one, this just has a few more steps. The project after that point is very simple and easy to do.
Supplies:
1 package of self-adhesive velcro- the package I used had 4 clear strips that were 3.5 inches long
1/3 yard of 4 different cotton fabrics
1/2 yard of fusible backing- I asked the counter lady which would be best for the ability to fold but not lose its strength.
Iron- Pre-heated to Cotton Setting
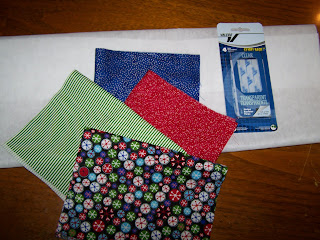
Step 1: Cut each of your 4 fabrics into 7" x 12".


Step 5: Cut each of the 4 colors in to 1" strips. You will have 7 of each color.

Step 6: Remove all of the edges that have the fusible fabric showing.

Step 7: Open your package of velcro and pair up the hook and loop so you will have a set. I had 4 sets in my package.

Step 10: Take 1 of the pieces of velcro. Remove the adhesive backing. Place about 1" from the end of the fabric strip. Apply pressure to bond the fabric and velcro.
Step 11: Fold other end of fabric strip to make a loop.
Step 12: Remove remaining adhesive backing. Apply the inside end of the loop on to the adhesive. Apply pressure to bond the fabric and velcro.


Today's blog was going to be that very thing; a paper chain- only I was going to make it out of scrapbook paper instead of the traditional red and green construction paper. Then on my way to Michael's to pick up the scrapbook paper, I changed my mind; that would be such a waste of beautiful scrapbook paper; there has to be a better way. So, I came up with this idea instead. :)
I went to Jo-Ann's instead, and went straight to their remnant bins. That is where I found my first piece of fabric, and quickly I matched up 3 other fabrics and made my purchase. The lady cutting my fabric wanted to know what I was doing, and I told her my idea (hoping at this point it would work- or you would be making paper chains tonight) and she loved it. So... without waiting any longer here is tonight's new craft idea! :)
Project Note: I did the prepwork, just like you would prep the paper strips for your little one, this just has a few more steps. The project after that point is very simple and easy to do.
Supplies:
1 package of self-adhesive velcro- the package I used had 4 clear strips that were 3.5 inches long
1/3 yard of 4 different cotton fabrics
1/2 yard of fusible backing- I asked the counter lady which would be best for the ability to fold but not lose its strength.
Iron- Pre-heated to Cotton Setting

Step 1: Cut each of your 4 fabrics into 7" x 12".


Step 2: Place your 4 pieces of cotton fabric on to the fusible fabric with the shiny side up.
Note: The shiny side is where the glue is, and will ruin your iron if you iron the wrong side.


Step 3: Iron the fabric pieces to the fusible fabric. The time to adhere the fabrics together will vary depending on your heat setting of the iron.
Note: It is very important to make sure the fabric "seals" completely. You should not be able to pull the cotton and fusible fabric apart when completed.
Step 4: Cut apart the 4 pieces to look like this.

Step 5: Cut each of the 4 colors in to 1" strips. You will have 7 of each color.

Step 6: Remove all of the edges that have the fusible fabric showing.

Step 7: Open your package of velcro and pair up the hook and loop so you will have a set. I had 4 sets in my package.
Note: How many sets you end up with will depend on which package you purchase.

Step 8: Cut your strips of velcro into 1/2" pieces.

Step 8: Cut your strips of velcro into 1/2" pieces.
Note: It is easier to leave the adhesive backing on the matching sets for this.

Step 9: Take 1 strip of fabric; place face up on table.

Step 10: Take 1 of the pieces of velcro. Remove the adhesive backing. Place about 1" from the end of the fabric strip. Apply pressure to bond the fabric and velcro.

Step 11: Fold other end of fabric strip to make a loop.

Step 12: Remove remaining adhesive backing. Apply the inside end of the loop on to the adhesive. Apply pressure to bond the fabric and velcro.


Step 13: Your completed chain link should look like this.

Step 14: Repeat Step 10, Step 11 and Step 12 until all fabric strips and are used.
Step 15: Connect your chain links in any pattern you like. We used 7 of the black patterned fabric and 6 of each the blue, red and green pattern fabric.

You can store the chain links in a zippered storage bag, or you can even make a little sack out of fabric that you used. Thread some ribbon through it and you can have a pretty little bag to hold your new Christmas chain. :)
Monday, November 30, 2009
December Blog and Challenge
I hope everyone had a wonderful holiday filled with family, friends, good food, and memory making!
My goal for the month of December is to post at least one new craft idea each day up until Christmas Day. So you will have lots of choices for your holiday and many options to create a present that can be both a keepsake and memory for your family. :)
I welcome any and all questions from you; if something isn't quite clear, or if you would like to ask "what can I/you make with these items I have around the house?" then pass them on to me. I will try to answer all of your inquiries and questions as soon as possible, if I get too many, then I will answer them in the order I receive them. :)
Have a great day, and I look forward to sharing ideas with all of you this holiday season! :)
My goal for the month of December is to post at least one new craft idea each day up until Christmas Day. So you will have lots of choices for your holiday and many options to create a present that can be both a keepsake and memory for your family. :)
I welcome any and all questions from you; if something isn't quite clear, or if you would like to ask "what can I/you make with these items I have around the house?" then pass them on to me. I will try to answer all of your inquiries and questions as soon as possible, if I get too many, then I will answer them in the order I receive them. :)
Have a great day, and I look forward to sharing ideas with all of you this holiday season! :)
Subscribe to:
Posts (Atom)
