I have had some health issues of my own this past week that have not allowed for me to do much crafting. I will try to get some up in the next day or so for New Years projects.
I hope all of you had a wonderful Christmas and that 2010 has good health and prosperity for you and your family.
Wednesday, December 30, 2009
Friday, December 18, 2009
Corker Bows
I had so much fun gathering up supplies for projects to do this weekend! :) I was at a specialty store, and they had the cutest gift tags and I thought they could be re-purposed in an even cuter way- and a corker bow began to take shape in my head. ;)
My daughter loves to wear these fun curly ribbon creations, and this one is festive; but can be modified to be worn all year long. :)
Supplies:
1 large bell (the gift tags came 3 in a pack- only use 1 per corker)
Ribbon:
1/4" red satin ribbon (2 yards)
1/4" green satin ribbon (2 yards)
1/2" "jingle bells" white satin ribbon (1 yard)
1/2" silver ribbon (1 yard)
1 2-1/4" hair barrette (these are at Michael's- 20 for $2.99- by the jewelry findings)
Tools:
aluminum foil
hot glue gun
assorted diameter dowels (you can get these at any craft store- even Wal-Mart has them in their craft section)
Pre-heated oven to 250 degrees F

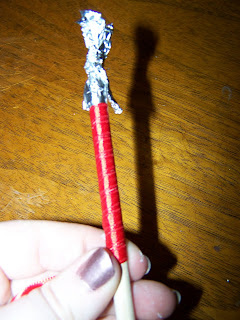
Step 1: Take any one of your ribbons and wrap around dowel until all ribbon is wrapped. See photo below. (I have found it easier to bind the ribbon with tinfoil and it won't damage your ribbon when you bake it.)

My daughter loves to wear these fun curly ribbon creations, and this one is festive; but can be modified to be worn all year long. :)
Supplies:
1 large bell (the gift tags came 3 in a pack- only use 1 per corker)
Ribbon:
1/4" red satin ribbon (2 yards)
1/4" green satin ribbon (2 yards)
1/2" "jingle bells" white satin ribbon (1 yard)
1/2" silver ribbon (1 yard)
1 2-1/4" hair barrette (these are at Michael's- 20 for $2.99- by the jewelry findings)
Tools:
aluminum foil
hot glue gun
assorted diameter dowels (you can get these at any craft store- even Wal-Mart has them in their craft section)
Pre-heated oven to 250 degrees F

Step 1: Take any one of your ribbons and wrap around dowel until all ribbon is wrapped. See photo below. (I have found it easier to bind the ribbon with tinfoil and it won't damage your ribbon when you bake it.)


Step 2: Repeat Step 1 for remaining ribbons.

Step 3: Bake all ribbons in your pre-heated oven for 20 minutes. 
Step 5: Trim your ribbons to desired lengths and pattern them how you like. 
Step 6: Cut a piece of one of your ribbons to tie in the middle of your curly ribbon lengths. See photo below for clarification. 


Step 3: Bake all ribbons in your pre-heated oven for 20 minutes.
Step 4: Remove ribbons from oven, cool (about 5 minutes) and remove dowels. Should look like photo below.

Step 5: Trim your ribbons to desired lengths and pattern them how you like.

Step 6: Cut a piece of one of your ribbons to tie in the middle of your curly ribbon lengths. See photo below for clarification.


Step 7: Tie a knot with the ribbon from Step 6.


Step 10: Tie a knot to secure your bell in place.


That's it!

This is what it looks like in her hair.
Below is another corker that I made for her using all different widths of ribbon.


Step 8: Remove all of the gift tag paper from your bell.

Step 9: Thread your bell through the ribbon you tied in the middle. See photo below.

Step 10: Tie a knot to secure your bell in place.

Step 11: Place a drop of glue in the middle of your barrette. Quickly place the knot you made securing your bell and middle of the ribbons on the glue.


That's it!

This is what it looks like in her hair.
Below is another corker that I made for her using all different widths of ribbon.

This really can be made with any ribbons and any color combination. Be creative- if you find something that you love, you can make the corker match it; or you can match an outfit. I've made these for her soccer teams to use during games, they go together very quickly, and become addictive. :)
Thursday, December 17, 2009
Sorry, no craft project tonight (Thursday, Dec. 17th)
I was busy at the local craft stores here and time has slipped away from me today. I will post 2 projects tomorrow and have a few for the weekend. Have a good night! :)
Wednesday, December 16, 2009
Candy Cane Reindeer
This project brings back so many childhood memories. :) My mom used to make these with my younger sister and I to give away as gifts to friends in school. Now my own little girl is going to continue the tradition and pass them on to her entire class Friday. :)
This is a very inexpensive project for a classroom- it could even be done as a classroom take-home project. I bought the candy canes at Wal-Mart for 88 cents; the rest of the items I bought at Michael's. The pom poms have 100 in the package for $2.49, the 7mm wiggley eyes were on sale for $1.49 and have 282 in the package, the chenille stems have 25 in the package for 99 cents.
If you wanted to make more than 1 dozen reindeer, you would have to buy 1 package of chenille stems for each 1 package of candy canes; you have enough pom poms to make 100 reindeer and enough eyes for 141 reindeer. :)
Supplies (will make 12 reindeer)
1 box of the larger candy canes- we used peppermint, but any flavor would work for this
1 package of beige chenille stems (pipe cleaners) you could also use dark brown (or any color- red, green, white, black, etc.)
1 package of 7mm wiggley eyes
1 package of 10mm red pom poms (you can use any color- I've used different colors with different candy canes to make them coordinate.)
Tools:
Glue
Scissors

For 1 reindeer you will need:
1 candy cane
2 chenille stems
2 wiggley eyes
1 pom pom

Step 1: Fold one of your chenille stems in half.

Step 2: Hook your candy cane through your folded in half chenille stem. Refer to photo below.


Step 5: Twist each of your chenille stem halves (like a bread bag twist tie) until it is entirely twisted. Refer to picture.

Step 6: Take the remaining chenille stem, cut in half. Cut each half in half. You should have 4 pieces that are the same size. 
Step 7: Fold each of the 4 pieces from Step 6 in half. 
Step 8: Place one of the folded pieces from Step 7 around one of your chenille stems. Refer to photo below for clarification. Twist this smaller piece (like a bread bag twist tie) in place. 


This is a very inexpensive project for a classroom- it could even be done as a classroom take-home project. I bought the candy canes at Wal-Mart for 88 cents; the rest of the items I bought at Michael's. The pom poms have 100 in the package for $2.49, the 7mm wiggley eyes were on sale for $1.49 and have 282 in the package, the chenille stems have 25 in the package for 99 cents.
If you wanted to make more than 1 dozen reindeer, you would have to buy 1 package of chenille stems for each 1 package of candy canes; you have enough pom poms to make 100 reindeer and enough eyes for 141 reindeer. :)
Supplies (will make 12 reindeer)
1 box of the larger candy canes- we used peppermint, but any flavor would work for this
1 package of beige chenille stems (pipe cleaners) you could also use dark brown (or any color- red, green, white, black, etc.)
1 package of 7mm wiggley eyes
1 package of 10mm red pom poms (you can use any color- I've used different colors with different candy canes to make them coordinate.)
Tools:
Glue
Scissors

For 1 reindeer you will need:
1 candy cane
2 chenille stems
2 wiggley eyes
1 pom pom

Step 1: Fold one of your chenille stems in half.

Step 2: Hook your candy cane through your folded in half chenille stem. Refer to photo below.

Step 3: Twist your chenille stem (like a bread bag twist tie) until secure, should be about 3 times.
Note: Make sure you twist close to the candy cane, but be careful not to snap the candy cane.)

Step 4: Bend each half in half again. (It should look like rabbit ears.)

Step 5: Twist each of your chenille stem halves (like a bread bag twist tie) until it is entirely twisted. Refer to picture.

Step 6: Take the remaining chenille stem, cut in half. Cut each half in half. You should have 4 pieces that are the same size.

Step 7: Fold each of the 4 pieces from Step 6 in half.

Step 8: Place one of the folded pieces from Step 7 around one of your chenille stems. Refer to photo below for clarification. Twist this smaller piece (like a bread bag twist tie) in place.

Step 9: Repeat Step 8 only this time place smaller stem higher on the same side. This is your reindeer's antler on one side.

Step 10: Repeat Step 8 and Step 9 for the other side. Refer to picture for clarification.

Step 11: Glue your eyes and nose in place.


That's it! :) 1 down... 23 more to go! ;)
Tuesday, December 15, 2009
How to crochet... part 2 of 2
Today's tutorial is broken in to 3 different sections. I used different yarn in the pictures to show you the difference. :) If you have any questions or need clarification, e-mail me or post a comment and I'll do my best to answer it for you. :)
Single Crochet
Step 1: Finish your chain stitch row to desired stitch length. Add 2 more chain stitches to this number. (Similar to the 3 chain stitches at the end of a row for double crochet.)

Step 2: Insert your hook in to the chain stitch 3rd from the end.

Step 3: Wrap your hook with the yarn, and pull through the chain. It should look like the photo below.

Step 4: Wrap your hook with the yarn. It should look like the photo below.

Step 5: Pull through both of the loops. It should look like the photo below.

Now you have completed a single crochet stitch! :)
Repeat Steps 2-5 for each single crochet stitch row. When you reach the end of your row, make 2 chain stitches and start your next row.
That's it! :)
Now for changing your yarn color...
Changing Colors
This can be done 2 different ways. I am showing you the more challenging version; the other is simple and I will explain it before I proceed with the photos. :)
The simple way is to tie a double knot with your 2 yarn color ends. That way it becomes 1 strand and you proceed as such. This is very easy, the only issue becomes if the ends fray and mix into your stitches with a lump, but you should be able to mesh the two colors together fairly simply with this method.
Now the more difficult way...
You have just finished your double crocheted row of color A (I am doing a peppermint stripe scarf, so color A is red and color B is white) and want to add color B...
Step 1: Make your loop before you begin your 3 chain stitches a little bit larger than normal.

Step 2: Get color B, and wrap your hook with color B and pull through your loop of color A. (You will not have color A on your hook at this point.) It will look like the photos below.


Step 2: Pull the end of your yarn though the loop until your loop closes completely. 


Step 3: Weave your end of yarn through your other stitches to keep end from fraying and coming loose which can unravel your project. See photos below.


Step 4: Tie a double knot a few stitches back. Trim yarn end off.


Single Crochet
Step 1: Finish your chain stitch row to desired stitch length. Add 2 more chain stitches to this number. (Similar to the 3 chain stitches at the end of a row for double crochet.)

Step 2: Insert your hook in to the chain stitch 3rd from the end.

Step 3: Wrap your hook with the yarn, and pull through the chain. It should look like the photo below.

Step 4: Wrap your hook with the yarn. It should look like the photo below.

Step 5: Pull through both of the loops. It should look like the photo below.

Now you have completed a single crochet stitch! :)
Repeat Steps 2-5 for each single crochet stitch row. When you reach the end of your row, make 2 chain stitches and start your next row.
That's it! :)
Now for changing your yarn color...
Changing Colors
This can be done 2 different ways. I am showing you the more challenging version; the other is simple and I will explain it before I proceed with the photos. :)
The simple way is to tie a double knot with your 2 yarn color ends. That way it becomes 1 strand and you proceed as such. This is very easy, the only issue becomes if the ends fray and mix into your stitches with a lump, but you should be able to mesh the two colors together fairly simply with this method.
Now the more difficult way...
You have just finished your double crocheted row of color A (I am doing a peppermint stripe scarf, so color A is red and color B is white) and want to add color B...
Step 1: Make your loop before you begin your 3 chain stitches a little bit larger than normal.

Step 2: Get color B, and wrap your hook with color B and pull through your loop of color A. (You will not have color A on your hook at this point.) It will look like the photos below.


Step 3: Pull color A's yarn tightly, it will close the loop and you will have only color B looped, as if that is the color you just finished your row with. Make your 3 chain stitches and double crochet your row.
Note: If you are going to make the peppermint scarf, you will make 2 rows of each color; if you are going to do another striped version, make sure to have your pattern rows an even number e.g. 4, 6, 8, etc. for this color change method to work.)
Step 4: You just finished 2 rows of color B. Pull color A's yarn back up and through the loop of color B. Refer to pictures below for clarification.


Step 5: Make 3 chain stitches in color A and begin your 5th row of double crochet.
Maintain this pattern (2 rows double crochet of color A; 2 rows of double crochet color B, etc) until you reach the desired length of your project.
The side of your project will look like this:

See the red yarn runs along the white row, and the white yarn runs along the red row, it will continue this pattern for the entire project.
Alright, enough of double crochet and single crochet... time to wrap up that project and finish it off! :)
Finishing
Step 1: Cut your yarn about 6 inches from your finished end. Leave your final loop from your stitch open. See photo below.

Step 2: Pull the end of your yarn though the loop until your loop closes completely.


Step 3: Weave your end of yarn through your other stitches to keep end from fraying and coming loose which can unravel your project. See photos below.


Step 4: Tie a double knot a few stitches back. Trim yarn end off.


That's it!
Have fun!! :)
Subscribe to:
Posts (Atom)
